0 to 60 with Source Control inside of SQL Operations Studio

Get to learning about git
It’s 2017, and if you or your workplace isn’t using some flavor of source control management (SCM) you’re probably in the minority. However, if you’ve been an operations or production DBA for a while, then there’s a good chance you haven’t had to dip your toes into managing code before. Now though? Code is everywhere: Changes to databases are being managed and deployed to production just like regular code releases, and our ever-changing and expanding roles (that might require other technologies, like, say, PowerShell) will, sooner or later, make this a priority. Even if you are an SCM veteran, managing code around databases usually required some third party tools to interact with your repositories. SQL Operations Studio looks to change all that, and put the source control tools right in your IDE.
So today, let’s explore how you can interact with source control with SQL Operations Studio, and if you’re new to SCM in general, then my hope is that this will also be a great introductory session as well.
Requirements
Before we begin, you’ll need two things:
- You need a source control repository. You might already have one, or this all might be new to you. Here’s all you need to know: this is where your source code is going to live, and when you make changes (or want to work on branches of code), this is the system that will manage it. For this demo, you can use either GitHub or Visual Studio Team Services (VSTS). In either case, make sure you have an account set up. Both are free and just take a second or so to create. I’m using GitHub for my demo just because it’s a little quicker and cleaner of an interface, but this process works the exact same way if you’re using VSTS.
- You need git scm installed on your local computer. It’s free and lightweight, and required by Operations Studio to do all the interaction with your source control solution. Download it here, and install it. The default installation options are all fine.
Let’s build a repository!
With our requirements out of the way, let’s set about setting up a repository. Depending on which solution you chose, the steps are a little different, but the important bit is in bold below:
- From your GitHub home page, click “New Repository.” You’ll be asked to give it a name, which means people will find it via https://github.com// so put a little thought into it.
- You’ll see some additional options when you create your repository, one to add a description, and one to initialize your repository with a README. Make sure you check this box, it’ll make setting this up on your computer a lot easier.
- Once you click “Create Repository” you’ll be taken to your new repository home page will show you your (blank) README. This means your repository is ready to go!
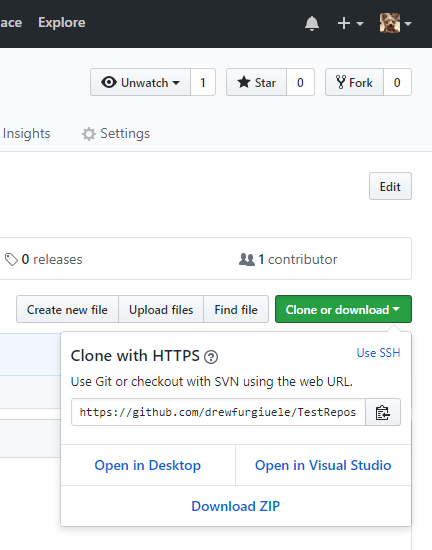
- Before you move on, look at the right side of the page: you’ll see a green button that says “clone or download.” Clicking it will give you a couple options that look like this:
 We’re most interested in the “Clone with HTTPS” section. See that URL? That’s going to be important in a couple steps, so keep that page up and handy.
Now we need to clone (or copy) your repository locally. While you can initialize a repository in SQL Operations Studio, if you’re new to Git and SCM it can be a little daunting. So we’re going to work the solution from the other end: creating an empty repository and then clone it locally. To do this though, we need to use the Git Bash shell.
- First, find a folder on your computer you want to use for your repository. I’m just using C:\Repositories on my local machine, but go nuts with any old name.
- Now launch Git Bash. When it launches, you’ll get a new shell window that opens up.
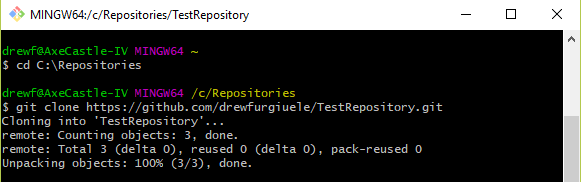
- In the shell window, we need to change to your repositories directory that you created in the previous step. Do that by typing cd C:\repositories in the window. Once you do, you’ll see your working directory in the shell change from ~ to your directory:
- Now we’re going to clone our repository! In the same shell window, type in git clone <your https url from above> . Mine looks like this:

Once it’s done, you should now have your repository folder inside the directory you created. Congratulations, you’ve got your repository cloned locally!
Staging, committing, pushing and pulling
So far, we’ve created a new repository and cloned it locally. Next we’re going to start interacting with it in SQL Operations Studio. Since SQL Operations studio is “SCM aware” all we have to do is open your local repository folder and it “just works.” In Operations Studio, open a folder by clicking “File -> Open Folder…” and then open the repository folder you cloned (not the folder you created; your repository should be a sub-folder inside of there with the name of your repository).
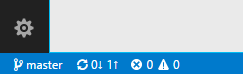
To see if everything worked, click the “source control” sidebar button (keyboard shortcut: control-shift-g). At the top, it should know about your repository:

Now, let’s go through pushing some code up to your repository. To get start, click the “explorer” button in Operations Studio. This should show you all the files currently in your local repository, which (should) only contain a README.md file. We’re now going to create a new file and add it to our source control.
- From the file menu, click “New Query.”
- Let’s keep this simple for now. In the code, type the following: SELECT ‘Hello World’ AS Message
- Save the file as “HelloWorld.sql”
Once you do that, SQL Operations Studio is going to detect a change in your repository. Your Source Control button probably lit up with a blue “1” indicating it knows you have a change. Click your Source Control button in your activity bar. You should see that “HelloWorld.sql” is listed as a change. Committing our change to our repository is a four-step process.
- First we need to stage the change. Every commit you make to source control is made up of staged changes. Staged changes can be one or many files. To stage a change in Operations Studio, click the “plus” sign that should appear when you mouse over the file name. The file should now appear under staged changes.
- Now we need to commit. To commit, you need to provide a message. Commit messages are important! They should describe what this change set contains. Type in something descriptive, or funny, or even an emoji in the “Message” box above your staged changes.
- Once you have your message, click the check-mark above the message box to commit. Once you do that, your status bar at the bottom of the page will change, indicating you have a pending change:

- To push your changes up to your repository, click that little arrow. This will sync your changes with your remote repository (and ask you to confirm).
When the process finishes, if you go back out to your repository, you should see your new file in your repository:

Congratulations, your code is now in source control! Notice the message next to HelloWorld.sql: that was my commit message. Had I staged multiple files, they all would have the same commit message.
So that takes care of pushing changes up, but what about getting changes back? After all, the cool thing about SCM is that your work can be collaborative. While you’re pushing changes up there, someone else might be working with it too. Getting changes back from source control is called “pulling.” We’re going to simulate that next.
Over on your GitHub site, we’re going to modify our README file. If you click on the file name in your repository and then the pencil/edit button, you can make some quick changes to the file. Here’s what I did:

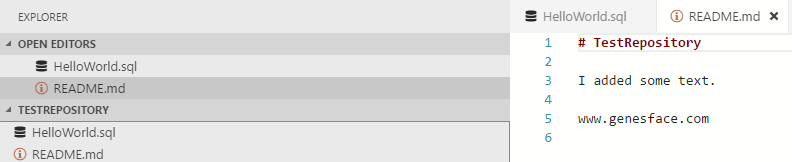
And just like in Operations Studio, you need to give your change a commit message at the bottom of the page. Go ahead and do that and commit the change. Once that’s done, we’ll need to get our changes down to our local copy. Back in Operations Studio, go to your Source Control panel again. If you click the three ellipses at the top of the panel, and click “pull,” and then open your README, it should match what you did online:
There you have it: source control! Isn’t that neat?
Next Steps
Of course, this just scratches the surface of using source control and Git. Now that you have a working example, I encourage you to read more especially about branching and merging, and your inevitable merge conflicts. I think branching is incredibly important if you like to tweak your scripts because it gives you a separate copy of your code to work on and test, and when you’re satisfied you merge your changes back to your master branch (or trunk).
Once you get the basics down, it’s really easy to start contributing other projects too! You could fork a project, work on it, and then submit a pull request to the owners to add features. Or, maybe someone will find code you made available and do the same. It’s amazing. Or a very minimum, this will get you up to speed on how you can introduce an SCM practice for SQL-related scripts at your workplace, if you don’t have one, or how you can start using it if you do (and don’t already).
Conclusion
I’m three blog posts deep into SQL Operations Studio now and I keep asking myself the same question: “who’s this product for?”
I think it’s easy to look at all the developer-oriented tools and lack of administrative ones in the product so far and say “this isn’t for DBAs.” I’d disagree, though: I think it’s important to remember what I said above. Now more than ever data platform professionals (and that includes DBAs) are getting more and more responsibilities and part of those will inevitably require knowledge of tools like Git and source control. SQL Operations Studio, to me, reinforces that notion by provided these tools and features in the product itself, instead of relying on add-ons and third-party tools or solutions.
Pingback: Source Control In SQL Operations Studio – Curated SQL
Can you have more than on repo? Seems I can only have one.