I contributed to dbatools, and you can too

If you’ve attended a SQL Saturday in the last year, watched a virtual chapter presentation, viewed an online conference, or have been watching twitter, you probably have heard about this amazing collaborative project going on: dbatools. If you haven’t, here’s the gist: a community-created PowerShell module that adds an absolute absurd amount of functions to help you manage, migrate, monitor, and validate your SQL Servers. The project was originally started by Chrissy LeMaire and she made the decision early on to put the entire codebase out on github for anyone to download and play with, with the hope that people would contribute.
And contribute they did: to date, there’s over 100 commands in the codebase, with more being added every day. With lots of key players with tons of PowerShell and SQL Server experience, some truly amazing automation and functionality is coming out of this community.
A while back, I had the chance to be a part of this exciting project. I volunteered to take on a particularly vexing and challenging area: SPNs and Kerberos authentication. Setting SPNs for SQL Server is something of an arcane science: knowing what SPNs to set for a particular instance of SQL Server can be tough. There are tools out there that can do it for you, but you still need to manage things like delegation. I wanted to make a series of commands that could ease this pain. So I signed up to do the work, and after a few months of slacking on doing it, I buckled down over a couple weekends and got to work. The most recent release of dbatools is out now, with my SPN commands in it. And honestly, I couldn’t feel prouder. Not because I have code that does something, but I was able to contribute to such a great idea and be a part of a wonderful team. It’s amazingly fulfilling, and I think it’s something more people should be a part of.
With that in mind, I thought I’d share a quick guide of the steps you can do, today, to join the team and be part of something amazing. You don’t need to (and shouldn’t) take this guide as gospel; your tools may vary depending on what you’re attempting to accomplish, but the basic ideas will be the same.
Step 1: Visit the #dbatools slack channel
If you haven’t yet, check out the SQL Server Community Slack channel by visiting https://sqlcommunity.slack.com and signing in. Once you’re there, click the little plus icon next to the channel icons to find and join the dbatools channel. Introduce yourself, get to know people. Type in :partyparrot: and it’ll be like you’ve been there the whole time. The channel is for talking about new commands, reviewing changes, or just talking about PowerShell. Being here lets you know who’s who, and watch as GitHub bots spam the channel with comments and pull requests.
Step 2: Check out the Github project page what’s in development.
Next, you should visit the project issues page. Here, you’ll find a list of all the features requested, in development and completed on the project. You can also filter the pages to look at current bugs or requested enhancements. Once you see what’s what, if you think of something you want to work on or help with, make a note of it. You should also look at examples of things in development and things that have been completed so you get an idea of the creative and technical process that goes into the project.
Step 3: Speak up!
Head on back to the Slack channel and let everyone know you want to help out. Someone (probably Chrissy) will add your Github account to to the project as a contributor so you can have things assigned to you. Congrats, you’re now on the hook!
Step 4: “Git” the right tools for the job
Now that you’ve got an assignment, it’s time to get prepped. In order to work on this project, you’ll need a Github account and the git utility installed on your computer. Registering for Github is easy: just visit the website and sign up.
Next, you need a utility called Git. Git is what you’ll use to manage your additions and changes to the code. There’s lots of different ways to use it, but I’m a purist so my examples will use the git bash shell. Git desktop and other applications work fine too. If this is your first time using git, just install it with the defaults. Full disclosure: using and understanding Git, even with version and source control experience, can be daunting and intimidating but don’t be scared of it!
At this point, you should have all you need to get started. However, if you want some tighter integration with Git/Github, you may want to consider using an IDE that supports connectivity and automation of syncing your changes. You’re spoiled for choice, but I am a tremendous fan of Visual Studio Code. It’s a wonderfully simple yet powerful code editor with support for pretty much any language you want to work in. If you want to follow along with what I’m doing, you can download it. Once you have VS Code, you need to install the PowerShell extension for VS Code. This will provide things like intellisense and code syntax checking as well as execution of code.

To get these extensions, just open VS Code and click on the extensions icon on the left-hand side. In the search box, type in “PowerShell” Find the one from Microsoft and install it. You’ll be prompted to restart Code. Now you have interactive debugging of code just like you do in the ISE; highlight some code and hit F8 to execute it. You can also have an interactive shell, too. Pretty sweet if you ask me.
Step 5: Create a fork of the project, clone your repository, create your own branch, and code like hell
Now that you have all the tools, it’s time to get the code so you can work on it. First, you’ll want to fork the project on GitHub. Head over to the main dbatools page and click “fork” in the upper-right hand side of the page. Boom, now you have your own little personal GitHub repository to work on. Once the project is forked, you could start working on it right away, but it’s better if you create your own branch. In your repository, click the “Branch: master” drop down and type in the name of a new branch. It can be whatever you want it to be. Then click “Create branch.”
To get your code to your local machine, in the folder you created, browse to it, and right click your mouse. If you installed git with the default options, you should get a context menu like this:
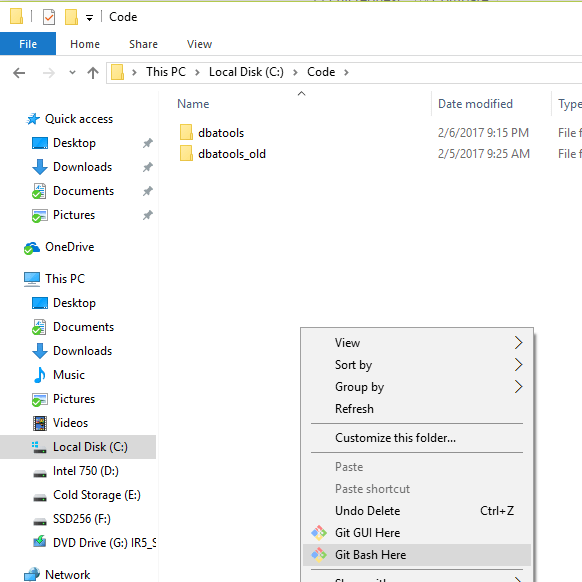
You’ll want to click “Git Bash Here.” That will open a really funny looking console window. This is where you can interact with the git utility. We’re going to use this to “clone” your repository locally. To do so, in the console, you’ll type git clone https://github.com/<your user name>/dbatools.git and hit enter. Once you do that, you can close the console.
Now that the code is on your machine, you’re ready to get to work. If you’re using VS Code, you can open the entire folder in the application and get the entire structure and git settings all pre-configured. With that in place, you can either start to modify functions or write your own. Chrissy has a great set of guidelines you should follow as to what to write, how to name your functions, and other project requirements.
As you make changes, you’ll see one of the sections in VS Code change too. For example, if you modify a file, you’ll see the Git icon change with a number, representing files you’ve changed. Clicking on it, you can see files that have been changed. To make sure a change gets put to your repository, you need to stage it. The process couldn’t be simpler: you’ll type in a brief message of what is included in this changeset, click each file you want to stage, and then click the green check mark to commit. Then, in the bottom left corner of the application, you’ll see the words “master.” Clicking there, you’ll want to locate the branch you created above.
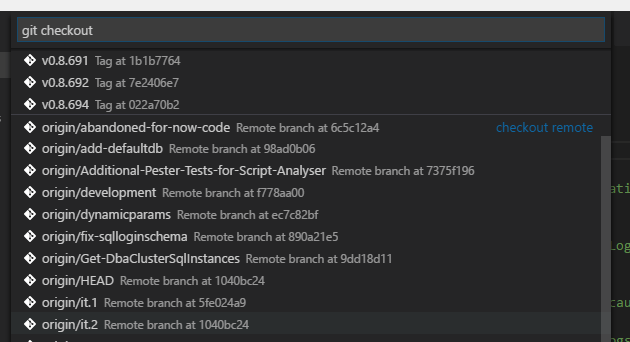
You might wonder what each of the other branches are; those are all the branches associated with the dbatools project. So if you wanted to work in someone’s else’s branch, you could (assuming they give you permissions to modify them). For now, just select the branch you were working in. If you’ve properly staged and committed your changes, you should see something similar to this:

You’ll see your current branch (I am working on a branch named “it.2”) and how many pending changes you will push and pull on your sync. To do the sync, you’ll click the cyclical arrows. Your changes are now in your repository! If you open your browser and head over to your Github page and look at your branch, you should see the file(s) you just synced will have “last modified time(s)” of close to when you clicked that button. And so it goes, testing, adding code, testing, fixing bugs… until you reach a point where your code is ready to be pushed to the codebase.
Step 6: Merge your branch back to the master branch of your own repository
You’ll want to merge your branch back to your master branch. To do so, browse back to your Github repository and click on “Branches.” Click on “Yours” just to see your own branches, and then in the branch you committed your changes to, click the “New pull request.”
A pull request will take your changes and pull them into a branch, effectively merging changes. In the window that pops up, you want to make sure you merge in your your master branch, and not the main project branch just yet. In the first series of dropdowns at the top of the page, on the left-hand side you’ll click where it says “base fork” and change it to your master repository. The other drop-down should already have your branch selected.
To see what you’re merging in, scroll down. Each change you made (new file, deleted file, or changed file) should be compared side-by-side. Once you review the changes, you can merge in your changes by clicking “Create pull request.” Since you’re merging into your own branch, on the next page you’re taken to, you can scroll down a bit until you see a green button that says “Merge pull request.” You’ll be asked to confirm and have the ability to provide comments.
Congratulations, you just took your branch and merged them into your master branch! You may be wondering why that’s important. If you don’t normally work with source control, branches are a way to make changes and then commit changes to a separate copy of the codebase. That way, if you mess something up, you can go back to the master branch and revert the changes.
Step 6: Creating a pull request to the main repository
Now that you’re satisfied with your changes, you need to get them over to the main dbatools project. You’re going to do another pull request. From your repository’s master branch, you’ll click “New pull request.” This time, however, you’re going to pull to the dbatools development branch. In the drop downs at the top of the page, make sure the “base form” is sqlcollaborative/dbatools and the base is “development.” This is something the dbatools team requests that you do, so that changes can be tested in a separate branch first before going to master (just like you did above in your own fork). Your changes will probably be merged with other people’s contributions here too.
Step 7: Code review and feedback
Dbatools is a community project, which means you’re going to get a code review. Other team members will review what you have, test it, and offer feedback. The best advice I can give you here is just be prepared for any all feedback, both good and bad. As linked above, the project has guidelines that must be adhered to and what may have been clear to you in your code might not be to other people. Also, these folks may have access to testing paramters you didn’t (or didn’t think of). Take it all in stride, and do not take any criticism personally. That’s not the intent of review; it’s to help everyone get better and code to a standard.
Expect to make changes, or have your code changed by other members. This is all okay! Once the code gets tested and tested some more, the time will come to have your changes merged into the master branch. Then, it’s Miller Time.
Step 8: Keep on keepin’ on
Once your code is published to the master branch, that means anyone who grabs the code from the PowerShell gallery will get to use your stuff. Don’t be surprised if people stop by the slack channel asking questions or asking for your help with using it, so help out where you can. And just because your code makes it in to the tools doesn’t mean your development stops. As more and more people view and use your code, changes might be needed. Don’t be a stranger, and do your best to keep up with changes and requests. And for heaven’s sake, keep your fork updated with the code from the master branch, because it changes, a lot!
Conclusion
So that’s it! Drop by the slack channel and tell everyone hello. If you get stuck on a particular step, don’t be afraid to ask for help. If this guide doesn’t work for you you can certainly call me out in the channel (type @pittfurg to create an alert on my machine) or on Twitter. Chrissy also has an excellent guide on getting started with Github and contributing as well that this guide is partly based on.
At the end of the day, the SQL Server PowerShell community is an extremely dedicated and resourceful group. Contributing to a project like dbatools isn’t just something to raise visibility to yourself, it’s about more than that. This team has a vision and a drive to make it the best set of tools possible and being a part of something that big is fulfilling its own right.
So there you have it: if you’ve ever wanted to share your knowledge and passion for such a project, the opportunity is there, you just have to take it.
very clear, well structured. If now one doesn’t want to contribute to the dbatools, there is no excuse any more.
Great job Drew, thanks a lot.
Pingback: Contributing To Open Source – Curated SQL