Active Directory Authentication with SQL Server on CentOS

In my last post about SQL Server on Linux, we looked at joining an Ubuntu Linux machine to an Active Directory Domain, and then configuring SQL Server to use Active Directory authentication. Ubuntu, which is based on the Debian Linux Kernel, is different from CentOS, which is based on the Red Hat kernel. This post is a continuation of the last one, but with instructions on how to do the same thing using CentOS. If you were put off by all the manual configuration we had to go through to make that work, you should be pleased to find out that using CentOS makes it a lot easier.
In the following post, we’ll walk through joining a Linux SQL Server on Centos to an Active Directory domain, and here’s the steps we’re going to take:
- Configuring the Linux host’s network configuration to talk to the Domain Controller(s),
- Installing the required software and services to enable a Linux host to talk to and join an Active Directory Domain,
- Using realm to join and configure the machine to an Active Directory domain, and
- Creating a Kerberos Keytab file for the SQL Server service to run as a domain service account.
Ready? Let’s dive right in.
When something doesn’t work…
Just like in the last tutorial, if you’re new to Linux this can all be a little confusing. That’s okay! I recommend doing this a few different times on both server and desktop installations of CentOS to get a feel for it. All the more reason to build a local or home lab, too.
What you need before we start
Before we start though, there’s a few things you’re going to need to have already set up:
- An Active Directory Domain to test in, and rights to administer it. Since we’re going to be creating (and possibly deleting, if there are errors) computer objects and a service account, you’ll need a domain account with adequate permissions.
- My example assumes you have a Microsoft DNS server running alongside your domain services. It is possible to use a separate DNS server to get this to work, but you might need some additional network configuration (see below). Also, depending on your environment, you might need a reverse lookup zone defined. If you notice long ping times or other weird lookups, I’d set one up in your DNS.
- A machine (virtual or otherwise) that is running CentOS 7 or later (and this guide was written and tested against CentOS 7). For this demo, we’ll be using the Server (minimal install) installation option. If you’re new to Linux, you might opt a desktop version (server with a GUI). When you download a CentOS disk image to install it, you get all these options on the default media; you won’t need separate downloads.
- When you install CentOS Linux, you’ll set up an initial user account and a root account. I recommend creating an account name that doesn’t exist in your domain already (something like “localadmin”). This initial account can also an administrator account, if you desire. Make sure you write down the password.
- Your machine should have access to the internet. We’re going to be installing a lot of software packages.
- Your machine ideally will have a static IP address. This will make configuring the network interfaces a lot easier. You can use DHCP, but it might add a few extra steps to your process (basically, you need to tell the networking service to override a lot of DHCP settings, and it’s a huge pain, but doable).
- Also, you’ll want to make sure your machine’s date and time is synced to your domain controller’s date and time. This has everything to do with Kerberos; if your date and times are off, you might get authentication errors. You can either set the time manually or use an NTP service. I’m going to omit setting that up here; but there are plenty of tutorials online.
- An installation of SQL Server on Linux. Microsoft has really straightforward documentation on how to do this. Even though that page points to the Red Hat set up, since CentOS is based on Red Hat’s kernel, the steps are identical. As part of setting up the instance, you’ll set an “sa” password. Make sure you write that down somewhere for now.
- Finally, you’ll need a way to connect to the host. The easiest way is to use PuTTY, but you can just as easily use a virtual console in your virtual machine manager du jour. You can, if you want, also install a GUI with CentOS. The setup will be the same, except for configuring your network settings; you’ll do that in the network manager instead.
If you have all these prerequisites, then we can begin.
“But what about Ubuntu or SUSE?”
This tutorial was written for CentOS (and by extension, Red Hat Enterprise Linux) and I already have a tutorial on how to do this on Ubuntu. Stay tuned to my blog for updates on other distributions.
Can’t find my way home
In this demo, I will be using a lab machine, lab-linuxsql-05 to join my domain, boatmurder.net (so if you’re following along at home, just substitute my hostname/domain name/IPs with your info). Before we even get to the fun part of manually installing and configuring all the required software and services to make authentication work, we first need to make sure our domain resolves correctly. Your Linux machine needs to know the IP address(es) of your domain controller(s) and the name of the domain for searches. If you’re using the Server version of CentOS, you’ll do this by manually editing the configuration file specific to your network adapter. This is usually the following file, which we can edit by typing the following:
sudo nano /etc/sysconfig/network-scripts/ifcfg-eth0
If you have a different network adapter or multiple network adapters, you can substitute the “0” for whichever you want to change. You can also view all the configured adapters by looking in that same directory.
Below is a screen shot of my configuration for my default network adapter. You’ll obviously need to change these entries to satisfy your network configuration. I’ve highlighted what I’ve changed from the default, DHCP-enabled adapter settings. I also disabled IPV6, but you don’t have to.
TYPE="Ethernet"
PROXY_METHOD="none"
BROWSER_ONLY="no"
BOOTPROTO="static"
IPADDR="20.20.1.55"
NETMASK="255.255.255.0"
DEFROUTE="yes"
IPV4_FAILURE_FATAL="no"
IPV6INIT="no"
IPV6_AUTOCONF="yes"
IPV6_DEFROUTE="yes
IPV6_FAILURE_FATAL="no"
IPV6_ADDR_GEN_MODE="stable-privacy"
NAME="eth0"
UUID="b5bedfae-cb47-44f1-af30-b166ffbada30"
DEVICE="eth0"
ONBOOT="yes"
You might have noticed we didn’t configure DNS settings in this network adapter’s settings. That’s because in CentOS, it’s located in a different configuration. We’ll edit that next by typing the following command:
sudo nano /etc/resolv.conf
This file might be empty, or it might have your search domain already entered (depending on if you gave your machine a name and domain when you installed the OS). You’ll want to make sure you have entries for your name servers that serve as DNS servers for your domain, and your domain name as the search. Here’s what I have, but you’ll change yours to suit your environment:
#Generated by NetworkManager
nameserver 20.20.1.1
search boatmurder.net
Next, we need to edit our hosts file to account for our domain name. This step makes sure that when we attempt to join the machine to an Active Directory domain, it will be able to register itself in the domain’s DNS server. At a terminal window, run the following command:
sudo nano /etc/hosts
Here’s what my file looks like. What we’re going to do is set out “localhost” entries to include our fully qualified domain name. Note the order of the entries; what I found interesting in my testing was I had much more success putting my entries with my FQDN first, and then adding in the non-FQDN entry after that. Unless you need IPV6, you can also comment out the lines below your IPV4 settings.
# /etc/hosts
127.0.0.1       localhost localhost.localdomain localhost4 localhost4.localdomain4
20.20.1.55      lab-linuxsql-05.boatmurder.net lab-linuxsql-05

# The following lines are desirable for IPv6 capable hosts, but I'm commenting them out (disabling IPv6, essentially)
#::1     localhost localhost.localdomain localhost6 localhost6.localdomain6
Once you make the changes to the file, save it (in nano, use Control-O to write out the file, and then Control-X to exit).
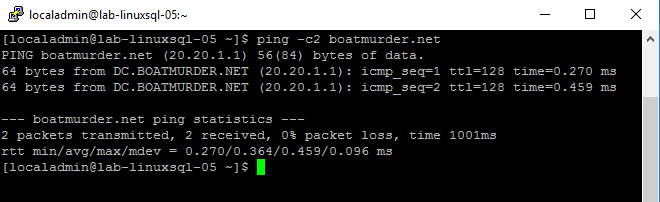
Next, you can either restart the network services on your machine or do a full reboot (I’d err on the side of completeness and just reboot). Once things come back online, you’ll want to test your domain name resolution. You can do this with a simple ping command. You want to make sure when you ping the domain name, you get an address back that matches your domain controller.
ping -c2 your_domain_name
If that returns your DC’s FQDN, you’re in business.
Installing the yum(my) packages
With that out of the way, we’re ready to start configuring our Linux installation to talk to Active Directory. To do that, we need some software. We’re going to install the following packages:
- Samba
- Krb5
- SSSD
- Various other, required packages
To simplify some of the configuration, we’re going to install them all at once with the following command:
sudo yum install sssd realmd oddjob oddjob-mkhomedir adcli samba-common samba-common-tools krb5-workstation openldap-clients policycoreutils-python
With the required software installed (and automatically configured), we’re now going to use realm to join the domain. Unlike the previous guide for Ubuntu, there’s no additional configuration needed to get this to work; it just does. To join the domain, we’ll type the following:
sudo realm join --user=<your AD domain admin name> <your domain name>
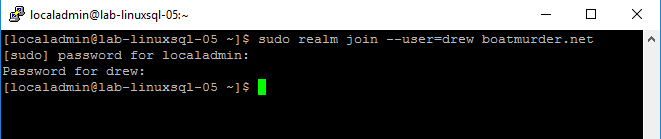
If everything works correctly, you’ll get no feedback on the screen, but your AD computer object will be created, and ti should create a new DNS entry for the server as well:

Let’s quickly test a domain login to the server. We’re going to run the following command to log in to a “new” session as a domain user:
su - <ad username goes here>@<domain>
The command “su” means “substitute user.” I should be asked for a password, and if everything works correctly…
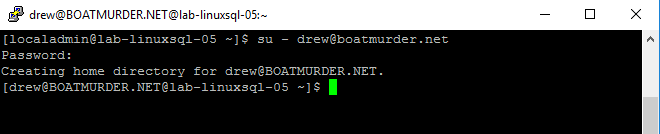
Success! We’re authenticating to Active Directory!
Why add the @domain to the su command?
In our last tutorial, you might remember we didn’t have to add the domain to our users; that’s because we manually configured our services to append it for us. The default behavior and configuration that realm uses doesn’t do that, so you need to qualify the domain users with the name of the domain. Of course, you can always change this.
Setting up SQL Server AD Authentication Support
Now we’re ready to set up the SQL Server Instance to run as a domain service account. Before we do that, we need to create a service account and set up an SPN for the account and service running on the Linux machine. You can do either this manually in the Active Directory GUI or with PowerShell (guess which one I prefer?). As before, you need a domain account with sufficient privileges to do this. To create the user account, you also need the Remote Server Administration Tools or Active Directory PowerShell module.
Here’s a quick and dirty PowerShell command you can run (again, as a domain administrator) to create a service account. I am going to use the account name linuxsqlsvc as my service account:
Import-Module ActiveDirectory
New-ADUser linuxsqlsvc -AccountPassword (Read-Host -AsSecureString "Enter Password") -PasswordNeverExpires $true -Enabled $true
Once that’s done, you need to set up an SPN for the account we just created. There’s lots of ways to do this (including with PowerShell using dbatools), or you can just use the command line:
setspn -A MSSQLSvc/lab-linuxsql-05.boatmurder.net:1433 linuxsqlsvc
For my example, I’m setting it to my fully qualified hostname, setting the port (default 1433) and providing the account name. With that done, we can return to the Linux machine. To enable SQL Server to run as a domain service account, we’re going to create a keytab file. A keytab is sort of like a certificate; it contains encrypted credentials of an authenticated user with a valid Kerberos token. These credentials are then read by services and applications. This also requires that the account we create the keytab for is also the same account we set up the SPN for above. We validate this by making sure key version number is valid. First, we get the a new Kerberos token using the account we just created, and then key version number (kvno) by querying the SPN we just created:
kinit linuxsqlsvc
kvno MSSQLSvc/lab-linuxsql-05.boatmurder.net:1433
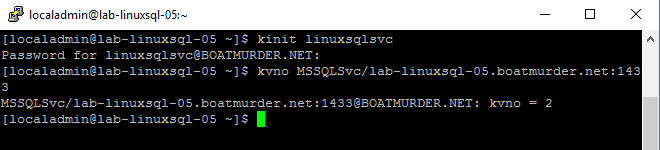
If this SPN is brand new, the kvno should equal “2” but make note of it. To create the keytab, we’re going to use a utility called ktutil. The ktutil process has it’s own prompts. You may be asked for the account password during the process; you’ll enter the password you created for the service account. This utility doesn’t validate that password, so make sure you type it correctly!
sudo ktutil
ktutil: addent -password -p MSSQLSvc/lab-linuxsql-05.boatmurder.net:1433@BOATMURDER.NET -k 2 -e aes256-cts-hmac-sha1-96
ktutil: addent -password -p MSSQLSvc/lab-linuxsql-05.boatmurder.net:1433@BOATMURDER.NET -k 2 -e rc4-hmac
ktutil: wkt /var/opt/mssql/secrets/mssql.keytab
ktutil: quit
Above, you can see my example. Yes, you do need the FQDN and port number, and the @DOMAIN after it (in all caps, as well). Without it, you might get “the user is from an unauthorized domain” errors when attempting to connect to your SQL Server with domain authentication.
Once the keytab is created, we need to set the ownership and permissions on the file. Instead of giving “root” the ownership, we’re going to set the mssql process as the owner:
sudo chown mssql:mssql /var/opt/mssql/secrets/mssql.keytab
sudo chmod 400 /var/opt/mssql/secrets/mssql.keytab
Finally, we tell the SQL Server instance to use the keytab file. We’ll run the mssql-conf command (like when SQL Server was first installed) and set the network.kerberoskeytabfile parameter and point it to where we saved the keytab:
sudo /opt/mssql/bin/mssql-conf set network.kerberoskeytabfile /var/opt/mssql/secrets/mssql.keytab
Finally, we’ll restart the SQL Server instance:
sudo systemctl restart mssql-server
Next, either with sqlcmd on the Linux machine or with SQL Server management studio, connect to the server with your “sa” account and password, and add a windows user or group login (I’d suggest it be either your account or a group you’re a member of), and then disconnect. Here’s an example. I’m connecting with SSMS using the “sa” password that was created when we installed SQL Server on Linux. I am then going to run a couple of T-SQL statements to add a Windows group that my account is a member of, and add it to the sysadmin role on the server.
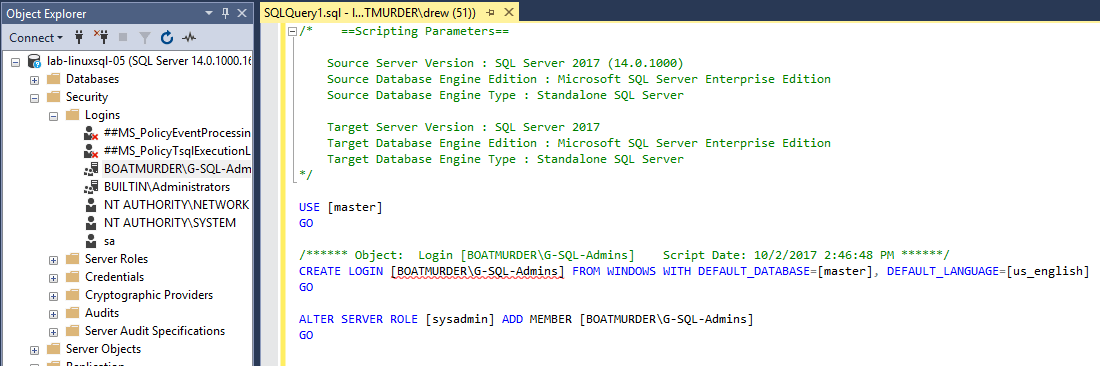
Then we’ll disconnect, and when you reconnect, use domain authentication. If everything worked…

That was a lot less work!
If you attempted to follow the Ubuntu guide, you might be wondering why this was a lot less work. Well, in short: the realm command takes care of a lot of configuration that our previous guide required, automatically. Realm takes care of configuring sssd (the critical piece for SQL Server authentication) and all the other domain-level authentication for the OS, too. Which begs the question, can you use realm with Ubuntu? Well, yes… but I’ve had much better success manually configuring all the services myself. Try it for yourself and see!
Bootnote: Re-joining a domain after using realm
If you ever manually delete the computer object of a machine you’ve joined to a domain using realm, that will certainly remove it from the domain. However, before you can add it back, you might need to tell the machine you kicked off the domain that it actually left. Computers that use realm to join a domain have to be told that they are no longer a part of one.
To do this, you’ll run the following command:
sudo realm leave

This will un-configure the domain configurations for your server. Once this is done, you can re-join the domain using the realm join command you used above.
Pingback: Active Directory On CentOS – Curated SQL